Georg Lukas,
This post describes how to start "Intelligent Provisioning" or the "HP Smart Storage Administrator (ACU / SSA)" on a Gen8 server with a broken NAND, so that you can change the boot disk order. It has been successfully tested on the HPE MicroServer Gen8 as well as on a ProLiant ML310e Gen8, using either a USB drive or a µSD / SD card with at least 1GB of capacity.
Update 2021-05-17: to consistently boot from an SSD in port 5, switch to Legacy SATA mode. See below for details.
Changing the Boot Disk
HP Gen8 servers in AHCI mode will always try to boot from the first disk in the (non-)hot-swap drive bay, and completely ignore the other disks you have attached.
The absolutely non-obvious way to change the boot device, as outlined in a well-hidden comment on the HP forum, is:
- Change the SATA mode from "AHCI" to "RAID" in BIOS
- Ignore the nasty red and orange warning about losing all your data
- Boot into HP "Smart" Storage Administrator
- Create a single logical disk of type RAID0
- Add the desired boot device (and only it!) to the RAID0
- Profit!
The disks in the drive bay will become invisible as boot devices / to your GRUB, but they will keep working as before under your operating system, and there seems to be no negative impact on the boot device either.
This is great advice, provided that you are actually able to boot into SSA (by
pressing F5 at the right moment during your bootup process).
WARNING / Update 2020-10-07: apparently, booting from an SSD on the ODD port (SATA port 5) is not supported by HPE, so it is a pure coincidence that it is possible to set up, and your server will eventually forget the RAID configuration of the ODD port, falling back to whatever boot device is in the first non-hot-plug bay. This has happened to me on the ML310e, but not on the MicroServer (as reported in the forum) yet.
Update 2021-05-17: after another reboot-induced RAID config loss, I have done some more research and found this suggestion to switch to Legacy SATA mode. Another source in German. I have followed it:
- Reboot into BIOS Setup (press
F9), switch to Legacy SATA- System Options
- SATA Controller Options
- Embedded SATA Configuration
- SATA Legacy Support
- Embedded SATA Configuration
- SATA Controller Options
- System Options
- Reboot into BIOS Setup (press F9), switch boot controller Order
- Boot Controller Order
- Ctlr:2
- Boot Controller Order
- Optional 😉: shut down the box and swap the cables on ports 5 and 6.
- Profit!
My initial fear that the "Legacy" mode would cause a performance downgrade so far didn't materialize. The devices are still operated in the fastest SATA mode supported on the respective port, and NCQ seems to work as well.
The Error Message
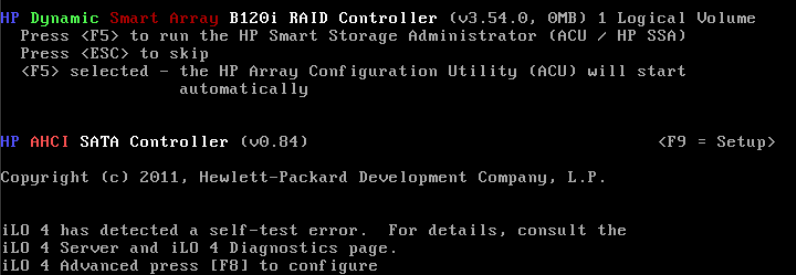
However, for some time now, my HP MicroServer Gen8 has been showing one of those nasty NAND / Flash / SD-Card / whatever error messages:
- iLO Self-Test reports a problem with: Embedded Flash/SD-CARD. View details on Diagnostics page.
- Controller firmware revision 2.10.00 Partition Table Read Error: Could not partition embedded media device
- Embedded Flash/SD-CARD: Embedded media initialization failed due to media write-verify test failure.
- Embedded Flash/SD-CARD: Failed restart..
..or a variation thereof. I have ignored it because I thought it referred to the SD card and it didn't impact the server in noticeable ways.
At least not until I wanted to make the shiny new SSD that I bought the
default boot device for the server, which is when I realized that neither the
F5 key to run HP's "Smart" Storage Administrator tool, nor the F10 key
for the "Intelligent" Provisioning tool (do you notice a theme on their
naming?) had any effect on the boot process.
The "Official" Solution
The general advice from the Internet to "fix" this error is to repeat the following steps in random order, multiple times:
- Disconnect mains power for some minutes
- "Format Embedded Flash and reset iLO" from the iLO web interface
- "Reset iLO" from the iLO web interface
- Reset the CMOS settings from the F9 menu
- Reset the iLO settings via mainboard jumpers
- Downgrade iLO to 2.54
- Upgrade iLO to the latest version
- Send a custom XML via HPQLOCFG.exe
And once the error is fixed, to boot the Install Provisioning Recovery Media to put back the right data onto the NAND.
I've tried the various suggestions (except for the iLO downgrade, because the HTML5 console introduced in 2.70 is the only one not requiring arcane legacy browsers), but the error remained.
So I tried to install the provisioning recovery media nevertheless, but it failed with the anticipated "Error flashing the NVRAM":
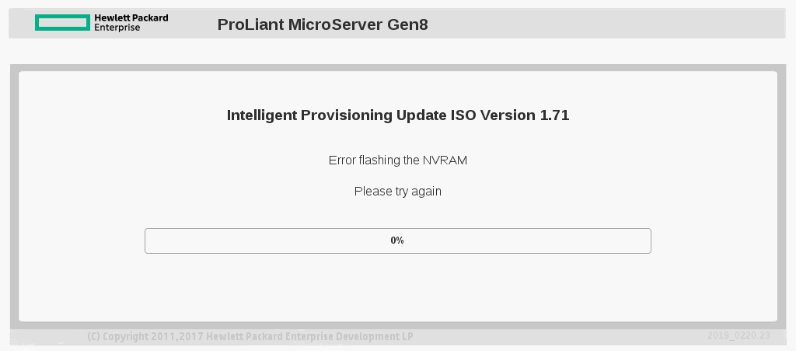
(it will not boot the ISO if you just dd it to an USB flash drive, but you
can put it on a DVD or use the "Virtual Media" gimmick on a licensed iLO)
If none of the above "fixes" work, then your NAND chip is probably faulty indeed and thus the final advice given is:
- Contact HPE for a replacement motherboard
However, my MicroServer is out of warranty and I'm not keen on waiting for weeks or months for replacement and shelling out real money on top.
Booting directly into SSA / IP
But that fancy HPIP171.2019_0220.23.iso we downloaded to repair the
NAND surely contains what we need, in some heavily obfuscated form?
Let's mount it as a loopback device and find out!
# mount HPIP171.2019_0220.23.iso -o loop /media/cdrom/
# cd /media/cdrom/
# ls -al
total 65
drwxrwxrwx 1 root root  2048 Feb 21  2019 ./
drwxr-xr-x 5 root root  4096 Sep 11 18:41 ../
-rw-rw-rw- 1 root root 34541 Feb 21  2019 back.jpg
drwxrwxrwx 1 root root  2048 Feb 21  2019 boot/
-r--r--r-- 1 root root  2048 Feb 21  2019 boot.catalog
drwxrwxrwx 1 root root  2048 Feb 21  2019 efi/
-rw-rw-rw- 1 root root  2913 Feb 21  2019 font_15.fnt
-rw-rw-rw- 1 root root  3843 Feb 21  2019 font_18.fnt
drwxrwxrwx 1 root root  2048 Feb 21  2019 ip/
drwxrwxrwx 1 root root  2048 Feb 21  2019 pxe/
drwxrwxrwx 1 root root  6144 Feb 21  2019 system/
drwxrwxrwx 1 root root  2048 Feb 21  2019 usb/
# du -sm */
2   boot/
5   efi/
916 ip/
67  pxe/
30  system/
4   usb/
# ls -al ip/
total 937236
drwxrwxrwx 1 root root      2048 Feb 21  2019 ./
drwxrwxrwx 1 root root      2048 Feb 21  2019 ../
-rw-r-xr-x 1 root root 125913644 Feb 21  2019 bigvid.img.gz*
-rw-r-xr-x 1 root root 706750514 Feb 21  2019 gaius.img.gz*
-rw-r-xr-x 1 root root       114 Feb 21  2019 manifest.json*
-rw-rw-rw- 1 root root       140 Feb 21  2019 md5s.txt
-rw-rw-rw- 1 root root       164 Feb 21  2019 sha1sums.txt
-rw-r-xr-x 1 root root 127058868 Feb 21  2019 vid.img.gz*
# zcat ip/gaius.img.gz | file -
/dev/stdin: DOS/MBR boot sector
The ip directory contains the largest payload of that ISO, and all three
.img.gz files look like disk images, with exactly 256MB (vid), 512MB
(bigvid) and 1024MB (gaius) extracted sizes.
Following the "bigger is better" slogan, let's write the biggest one,
gaius.img.gz to an USB flash drive and see what happens!
# # replace /dev/sdc below with your flash drive device!
# zcat gaius.img.gz |dd of=/dev/sdc bs=1M status=progress
... wait a while ...
# reboot
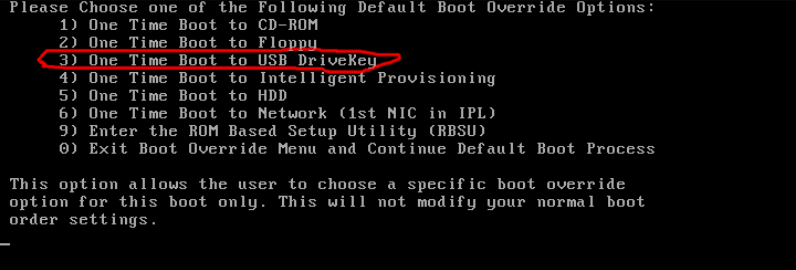
Then, on boot-up, select the "USB DriveKey" option:
And you will be greeted by a friendly black & white GRUB loader, offering you "Intelligent" Provisioning and "Smart" Storage Administrator, which you can promptly and successfully boot:
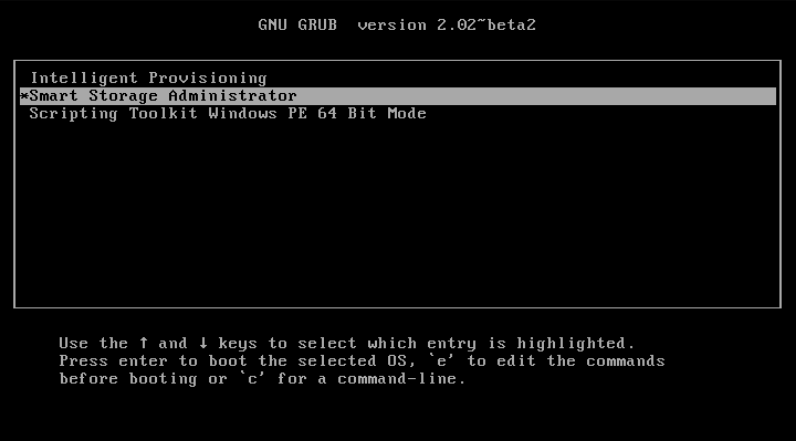

From here, you can create a single logical volume of type RAID0, add just your boot disk into it, restart and be happy!