
Georg Lukas, 2024-07-05 18:46
From 2009 to 2014, Samsung released dozens of camera models and even some camcorders with built-in WiFi and a feature to upload photos and videos to social media, using Samsung's Social Network Services (SNS). That service was discontinued in 2021, leaving the cameras disconnected.
We are bringing a reverse-engineered API implementation of the SNS to a 20$ LTE modem stick in order to email or publish our photos to Mastodon on the go.
Social Network Services (SNS) API
The SNS API is a set of HTTP endpoints consuming and returning XML-like
messages (the sent XML is malformed, and the received data is not
syntax-checked by the strstr() based parser). It is used by
all Samsung WiFi cameras created between 2011 and 2014,
and allows to proxy-upload photos and
videos to a series of social media services (Facebook, Picasa, Flickr,
YouTube, ...).
It is built on plain-text HTTP, and uses either OAuth or a broken, hand-rolled encryption scheme to "protect" the user's social media credentials.
As the original servers have been shutdown, the only way to re-create the API is to reverse engineer the client code located in various cameras' firmware (NX300, WB850F, HMX-QF30) and old packet traces.
Luckily, the lack of HTTPS and the vulnerable encryption mean that we can easily redirect the camera's traffic to our re-implementation API. On the other hand, we do not want to force the user to send their credentials over the insecure channel, and therefore will store them in the API bridge instead.
The re-implementation is written in Python on top of Flask, and needs to work around a few protocol-violating bugs on the camera side.
Deployment
The SNS bridge needs to be reachable by the camera, and we need to DNS-redirect the original Samsung API hostnames to it. It can be hosted on a free VPS, but then we still need to do the DNS trickery on the WiFi side.
When on the go, you also need to have a mobile-backed WiFi hotspot. Unfortunately, redirecting DNS for individual hostnames on stock Android is hard, you can merely change the DNS server to one under your control. But then you need to add a VPN tunnel or host a public DNS resolver, and those will become DDoS reflectors very fast.
The 20$ LTE stick
Luckily, there is an exciting dongle that will give us all three features: a
configurable WiFi hotspot, an LTE uplink, and enough power to run the
samsung-nx-emailservice right on it:
Hackable $20 modem combines LTE and PI Zero W2 power.
It also has the bonus of limiting access to the insecure SNS API to the local WiFi hotspot network.
Initial Configuration
There is an excellent step-by-step guide to install Debian that I will not repeat here.
On some devices, the original ADB-enabling trick does not work, but you can directly open the unauthenticated http://192.168.100.1/usbdebug.html page in the browser, and within a minute the stick will reboot with ADB enabled.
If you have the hardware revision UZ801 v3.x of the stick, you need to use a custom kernel + base image.
Please follow the above instructions to complete the Debian installation.
You should be logged in as root@openstick now for the next steps.
The openstick will support adb shell, USB RNDIS and WiFi to access it, but
for the cameras it needs to expose a WiFi hotspot. You can
create a NetworkManager-based hotspot using nmcli
or by other means as appropriate for you.
Installing samsung-nx-emailservice
We need git, Python 3 and its venv module to get started, install the
source, and patch werkzeug to compensate for Samsung's broken client
implementation:
apt install --no-install-recommends git python3-venv virtualenv
git clone https://github.com/ge0rg/samsung-nx-emailservice
cd samsung-nx-emailservice
python3 -m venv venv
source ./venv/bin/activate
pip3 install -r requirements.txt
# the patch is for python 3.8, we have python 3.9
cd venv/lib/python3.9/
patch -p4 < ../../../flask-3.diff
cd -
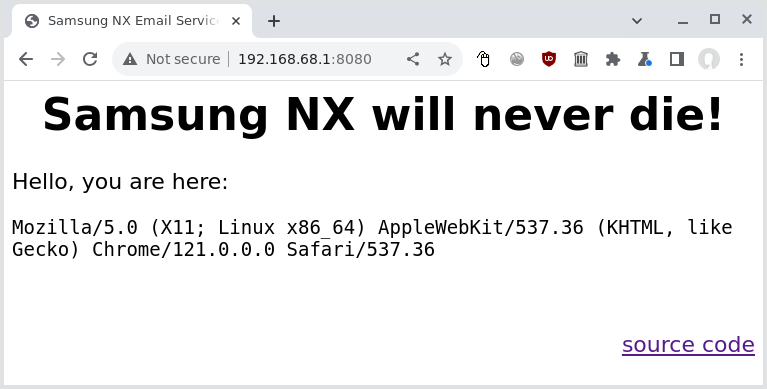
python3 samsungserver.py
By default, this will open an HTTP server on port :8080 on all IP addresses of the openstick. You can verify that by connecting to http://192.168.68.1:8080/ on the USB interface. You should see this page:
We need to change the port to 80, and ideally we should not expose the service
to the LTE side of things, so we have to obtain the WiFi hotspot's IP address
using ip addr show wlan0:
11: wlan0: <BROADCAST,MULTICAST,UP,LOWER_UP> mtu 1500 qdisc mq state UP group default qlen 1000
    link/ether 02:00:a1:61:c7:3a brd ff:ff:ff:ff:ff:ff
    inet 192.168.79.1/24 brd 192.168.79.255 scope global noprefixroute wlan0
       valid_lft forever preferred_lft forever
    inet6 fe80::a1ff:fe61:c73a/64 scope link
       valid_lft forever preferred_lft forever
Accordingly, we edit samsungserver.py and change the code at the end of the
file to bind to 192.168.79.1 on port 80:
if __name__ == '__main__':
    app.run(debug = True, host='192.168.79.1', port=80)
We need to change
config.toml
and enter our "whitelisted" sender addresses, as well as the email and
Mastodon credentials there. To obtain a Mastodon access token from your
instance, you need to
register a new application.
Automatic startup with systemd
We also create a systemd service file called samsung-nx-email.service in
/etc/systemd/system/ so that the service will be started automatically:
[Unit]
Description=Samsung NX API
After=syslog.target network.target

[Service]
Type=simple
WorkingDirectory=/root/samsung-nx-emailservice
ExecStart=/root/samsung-nx-emailservice/venv/bin/python3 /root/samsung-nx-emailservice/samsungserver.py
Restart=on-abort
StandardOutput=journal

[Install]
WantedBy=multi-user.target
After that, we load, start, and activate it for auto-start:
systemctl daemon-reload
systemctl enable samsung-nx-email.service
systemctl start samsung-nx-email.service
Using journalctl -fu samsung-nx-email we can verify that everything is
working:
Jul 05 10:01:38 openstick systemd[1]: Started Samsung NX API.
Jul 05 10:01:38 openstick python3[2229382]:  * Serving Flask app 'samsungserver'
Jul 05 10:01:38 openstick python3[2229382]:  * Debug mode: on
Jul 05 10:01:38 openstick python3[2229382]: WARNING: This is a development server. Do not use it in a production deployment. Use a production WSGI server instead.
Jul 05 10:01:38 openstick python3[2229382]:  * Running on http://192.168.79.1:80
Jul 05 10:01:38 openstick python3[2229382]: Press CTRL+C to quit
Jul 05 10:01:38 openstick python3[2229382]:  * Restarting with stat
Jul 05 10:01:39 openstick python3[2229388]:  * Debugger is active!
Jul 05 10:01:39 openstick python3[2229388]:  * Debugger PIN: 123-456-789
Security warning: this is not secure!
WARNING: This is a development server. [...]
Yes, this straight-forward deployment relying on python's built-in WSGI is not meant for production, which is why we limit it to our private WiFi.
Furthermore, the API implementation is not performing authentication beyond
checking the address againts the SENDERS variable. Given that transmissions
are in plain-text, enforcing passwords could backfire on the user.
Redirecting DNS
By default, the Samsung cameras will attempt to connect a few servers via HTTP to find out if they are on a captive portal hotspot and to interact with the social media. The full list of hosts can be found in the project README.
As we are using NetworkManager for the hotspot, and it uses
dnsmasq internally, we can
use dnsmasq's config syntax and create an additional config file
/etc/NetworkManager/dnsmasq-shared.d/00-samsung-nx.conf that will map all
relevant addresses to the hotspot's IP address:
address=/snsgw.samsungmobile.com/192.168.79.1
address=/gld.samsungosp.com/192.168.79.1
address=/www.samsungimaging.com/192.168.79.1
address=/www.ospserver.net/192.168.79.1
address=/www.yahoo.co.kr/192.168.79.1
address=/www.msn.com/192.168.79.1
After a reboot, we should be up and running, and can connect from the camera to the WiFi hotspot to send our pictures.
Hotspot detection strikes again
The really old models (ST1000/CL65, SH100) will mis-detect a private IP for the Samsung service as a captive hotspot portal and give you this cryptic error message:
Certification is needed from the Access Point. Connection cannot be made at this time. Call ISP for further details
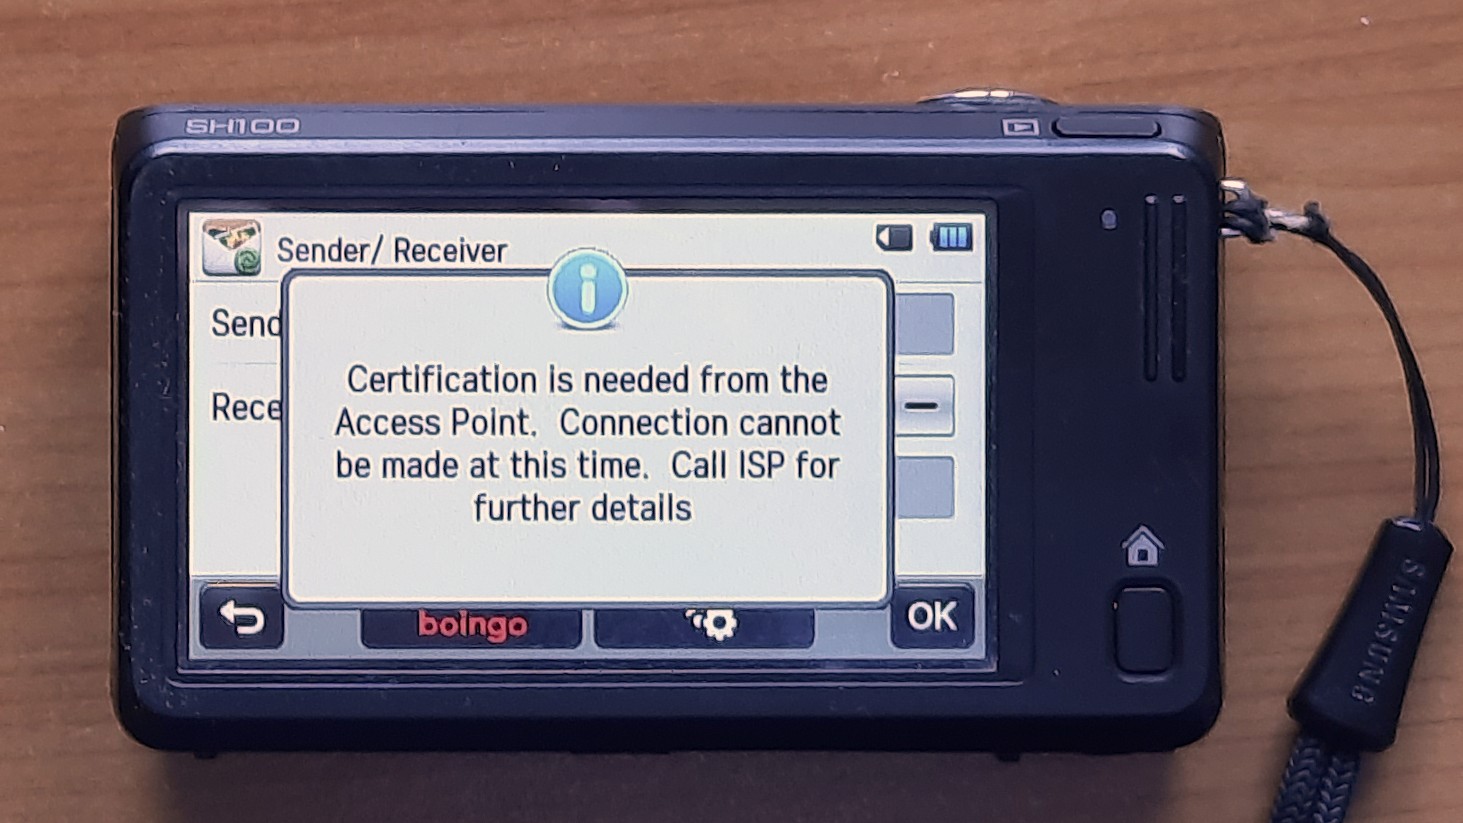
If you see this message, you need to trick the camera to use a non-private IP
address, which is by Samsung's standard one that doesn't begin with 192.168.
You can change the hotspot config in /etc/NetworkManager/system-connections
to use a different RFC 1918
range from 10.0.0.0/8 or 172.16.0.0/12, or you can band-aid around
the issue by dice-rolling a random IP from those ranges that you don't need to
access (e.g. 10.23.42.99), to return it from 00-samsung-nx.conf and to use
iptables to redirect HTTP traffic going to
that address to the local SNS API instead:
iptables -t nat -A PREROUTING -p tcp -d 10.23.42.99 --dport 80 -j DNAT --to-destination 192.168.79.1:8080
This will prevent you from accessing 10.23.42.99 on your ISP's network via HTTP, which is probably not a huge loss.
You can persist that rule over reboots by storing it in
/etc/iptables/rules.v4.
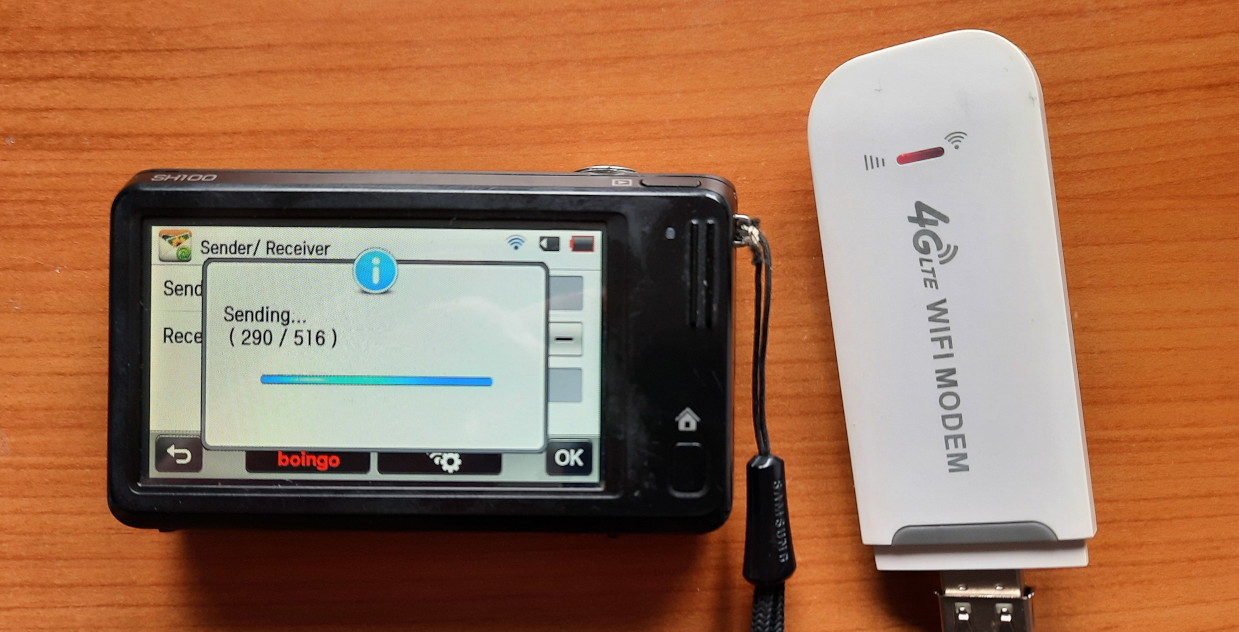
Demo
This is how the finished pipeline looks in practice (the whole sequence is 3 minutes, shortened and accelerated for brevity):
And here's the resulting post: